Hello Everyone,
It's been a little while but I have been busy working on my new business, Natural4U. We make 100% All Natural Hair and Body Products. Check us out at www.bewonderfulbenatural.com and see which products can work for you. Our products have multiple uses for today's on the go woman and we offer fragrance free options as well. Check us out! Oh and I hope you guys had a wonderful Thanksgiving. This Friday feels wonderful as I'm resting and watching Queen on the Centric channel,lol. I haven't seen that movie in ages.
Enjoy!
The Natural Hair Diaries &
Natural4U
Friday, November 29, 2013
Monday, October 14, 2013
Good Wash and Detangling Hair Day
Hello everyone!
Today is Columbus day and we had off from work. So I took this opportunity to my hair. I really feel like it's therapeutic to do my hair, especially when it turns out so well. It had been 3 weeks since my last wash and figured now was as good of a time as any. I first detangled my hair first by spritzing it with water and I actually finger detangled it. I've tried this before but I wanted to give it another try. I took my time and stayed up late last night and my detangling was a good experience. Since I twisted my hair using my Natural4U Shea Dream Hair & Body Cream...Coming soon by the way ;) It really aids in the detangling process and helps make it a breeze. Once that was done, went to bed. Woke up and did my favorite pre-poo, Amla Treatment...check out my other post below regarding this. I let this set in my hair for about 2 hours today. While doing this, I watched the R&B Divas Reunion Pt. 2 on Youtube...I was so glad to see it 'cause I missed it when it aired on t.v. last month. So after eating and watching youtube, I did my wash. I used my favorite shampoo right now...


Enjoy the rest of this beautiful day...
Today is Columbus day and we had off from work. So I took this opportunity to my hair. I really feel like it's therapeutic to do my hair, especially when it turns out so well. It had been 3 weeks since my last wash and figured now was as good of a time as any. I first detangled my hair first by spritzing it with water and I actually finger detangled it. I've tried this before but I wanted to give it another try. I took my time and stayed up late last night and my detangling was a good experience. Since I twisted my hair using my Natural4U Shea Dream Hair & Body Cream...Coming soon by the way ;) It really aids in the detangling process and helps make it a breeze. Once that was done, went to bed. Woke up and did my favorite pre-poo, Amla Treatment...check out my other post below regarding this. I let this set in my hair for about 2 hours today. While doing this, I watched the R&B Divas Reunion Pt. 2 on Youtube...I was so glad to see it 'cause I missed it when it aired on t.v. last month. So after eating and watching youtube, I did my wash. I used my favorite shampoo right now...

And I'm quite pleased with myself that I haven't wavered on this product. In the past, I usually tend to switch up my shampoos, but since realizing that a sulfate free shampoo is best for your hair, I've stuck with it and i really like it. You only need a little. I keep my hair in twists, take them down, wash my scalp first with a little bit of the shampoo, then I apply some to my hair to wash it, then I finger detangle my hair, rinse, and retwist. Then it's on to the next twist to repeat the same steps. I really like this finger detangling thing for pre-detangling and washing my hair. I believe it's better for your hair as it's more gentle on your hair strands while wet. Once hair was washed, I got out of the shower, dried my hair with a microfiber towel (but you can also use an old t-shirt), then proceeded to add my next fav leave in...
Again proud of myself for staying true to this product as well. Now this is where I used my comb. Whenever I apply a leave in, I like to use my comb. I only use a seamless comb on my hair when I comb it. Because my hair is strengthened due to my Alma treatment, I don't mind using it. I use what's called a bone comb and it's seamless and it doesn't snag the hair. I plan on selling these on my site aswell, but in the mean time look it up. Plastic wide tooth combs with seams in the teeth of the comb tend to snag your hair which can lead to breakage. My comb is made out of wood as is seamless but I'm hearing about some plastic combs that are seamless too. It's worth your investment to find a seamless comb when detangling your hair in the future. Here is the result of my comb after detangling my hair with mine...

For my naturals out there...not bad right? And this is why the wash/detangle hair day was a good one. Welp, the work's not done yet...must twist my hair for stying now. So more to come later on my results...
Enjoy the rest of this beautiful day...
The Natural Hair Diaries.
Sunday, September 22, 2013
Natural4U Products Sneak Peak and a first time record :)
I wanted to do a quick post before going to bed about the unveiling of one of my products for Natural4U...

Shea Dream
Hair and Body Cream© is the product in the above picture.
I used it tonight. I wanted to twist my hair up for the week and decided to see how long it would take me if I didn't stop and just continued to twist my hair. I watched briefly the Emmy's long enough to see that Kerry Washington didn't win Lead Role for her role in Scandal, then promptly switched channels to the TV show Revenge, and kept on twisting. The result was a personal record...3 hours and I was done. My results are below...I was impressed and wanted to post this :) It usually takes me a couple of days but I was determined to finish. I love how this hair cream feels...it has a whipped texture,is moisturizing, and helps make styling easy. It's also a great body moisturizer. Can't wait to share more with you all real soon...until then, sleep tight.
The Natural Hair Diaries.

Saturday, September 21, 2013
The Natural Hair Diaries Presents...Natural4U Products
Hello Everyone!
It's been a while and I wanted to get back to something that I enjoy alot and that's posting about hair. Right now I am taking down my twists and I've got 3 more to go (I should've been done and started the process of washing my hair but Sweet Home Alabama came on and well, I had to stop,lol) Anyway I was also working on my sketchbook of ideas for my next project...Natural4U Products. It's an All natural hair and body product line that I've been working on this summer. Something I've been wanting to do for some time now, but I decided that this year was that time to do it. No time like the present as they say. I am looking forward to sharing with you the new look here at Natural4U Products and what better way than to share it on social media with you all. I even created a Twitter account (@N4UProducts), it's open my eyes to a new world and I'm looking forward to all that's in store. Check it out.
More to come very soon...
The Natural Hair Diaires
Sunday, May 5, 2013
Doing my favorite Pre-poo...Amla Treatment :)

So, umm...yeah...I haven't posted in a while as you can see,lol...
But I felt the urge to post today because I am doing my favorite pre-poo treatment...Alma Treatment. I have the recipe on my site if you are interested in trying this out for yourself. I haven't had a chance to do my Amla treatments in a while. I'd like to say that I would do these once every 2 weeks but I'd be lying,lol. As a natural, I tend to want to try other pre-poos or brands in between doing Alma's and most of the time, my results aren't the same. I like to take pictures of my hair journey from time to time and it really helps me to document what styles or products work. When I looked back at my log, I realized that the last time I had washed my hair, it was on March 31st...yeah...I know.
I have been doing good things with my twists while they've been in for over a month. I spritz them at night and seal with either an oil or a Shea butter mixture. That kept my hair moisturized. I tell you it takes a while for me to do my hair, which isn't a bad thing because that means my hair is growing...ya! But it does take a while and since I've decided to add more twists to my hair, it takes even longer. The end result though is a style that can be done in many ways...up dos, ponytails, crinkly twists where if you braid them up at night after misting and sealing, you have wavy (crinkly) twists in the morning and a new hairstyle. The versatility of twists are endless, but when you are putting them in, you aren't as enthused about it,lol.
So today's post is two fold...I want to review the new products I'm trying and then show the final result of my twists.
In my Amla treatments, instead of using my usual cheaper conditioners I added a new one I bought recently called Andalou Naturals Moisture Rich Conditioner Argan and Sweet Orange -- 11.5 fl oz. Here is a pic...

My other purchase of new hair products was a shampoo and leave in conditioner that I've had my eye on in a while. Prior to buying the above product, I also got
Beautiful Curls Curly to Kinky Shampoo and Leave-in from Whole Foods a while back. I looked them up on my phone while at the store and saw some good reviews and decided to give it a try. I am on the hunt for a shampoo that won't strip my hair so I am going to see if this does the trick. Here is a pic below...


So I am in for a treat and ready to see how my hair will turn out...I will twist with my home made Shea butter mix (also on this site for the recipe) and go from there. Twisting my hair can no longer be done in one night so this will take a couple of days (I hope) but I'm ready for it. So stay tuned for my next post on my results...
The Natural Hair Diaries
Friday, June 29, 2012
Amla Treatment
(For some reason this post went out without me adding the recipe,lol...ok so let's try this again)
A friend of mine asked recently..."So what is an Alma treatment?"
Amla is an ayurvedic herb, gound into a powder. A paste is when you take an ayurvedic herb, mix it with boiling water, let it sit, then apply it to your hair. I call it a treatment because I add conditioners and oils to my mixture and use it as a pre-poo. Then wash it out and style. Amla is for conditioning the hair. Amla also cleans the scalp as well and in time, contributes to healthy hair and healthy scalp. Also, the more you use amla, the darker your hair will become. It also makes your curls pop which is something I love.
Here is a recipe that I uses to make my treatment...
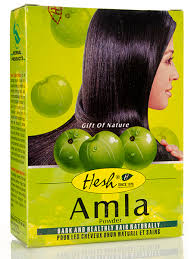 First you have to purchase a box of Amla powder like the one you see here. I use Hesh Amla I got mine from an Indian store and you can look for one in your area to purchase this. You can also look on amazon to buy it as well.
Your mix will look like this when you folloow the directions below...

The Natural Hair Diaries :)
A friend of mine asked recently..."So what is an Alma treatment?"
Amla is an ayurvedic herb, gound into a powder. A paste is when you take an ayurvedic herb, mix it with boiling water, let it sit, then apply it to your hair. I call it a treatment because I add conditioners and oils to my mixture and use it as a pre-poo. Then wash it out and style. Amla is for conditioning the hair. Amla also cleans the scalp as well and in time, contributes to healthy hair and healthy scalp. Also, the more you use amla, the darker your hair will become. It also makes your curls pop which is something I love.
Here is a recipe that I uses to make my treatment...
Your mix will look like this when you folloow the directions below...
- Detangle unwashed hair into twisted sections.
- Place 3 tbsp of amla powder into a bowl.
- Add 4 tbsp of conditioner (no protein) Use a cheapie one for this recipe.
- Add 3 - 4 tbsp of another conditioner (no protein).
- Add 2 tspn of coconut oil
- Add 2 tspn of another oil (olive oil)
- Add 2 tspn of another oil (jojoba, coconut, olive, etc.)
- 1/2 cup of water (use sparingly as you don't want mix to be runny).
- Your mix should be like a paste.
- Add 6 drops of essential oils : Rosemary and Lavender.
- Mix together and smooth onto hair with fingers. Don't comb through.
- Place a plastic cap on & let it sit for an hour.
- Rinse off, wash your hair as you would normally, and then style.
- Any leftovers can be placed in the freezer for future use.
The Natural Hair Diaries :)
Thursday, June 28, 2012
Curlformers (My First Attempt)
Ok so in June 2nd (Saturday) I decided to do my first Curlformers set by myself. I had Curlformers done on my in the past by one of my friends and it took a minute for her to put them in there. The results were nice and done during the Winter time. Nevertheless, I wanted to try it myself and see what I could do. Now luckily, during this weekend, the humidity was low and the temp was about 70 (high). So I figured, why not. Prior to this, I purchased the Curlformers pack at Sally's Beauty Supply. Click on the word Curlformers to learn more about this product or to order your own.
Curlformers
I am also a Beauty Card Club Owner so I did get this product at $63.99 price. I suggest if you love Sally's like I do, you may want to do the same. The card costs $5 and you can get discounts on the products you buy instore as well as online. Not to mention coupons. But I'm getting side tracked here,lol...
Anyway, I figured it was an investment that would pay for itself since going to the salon and getting a rod set costs usually $65 and if I'm doing it myself, I don't have to get mad when the style I paid for doesn't quite look like I had imagined it would,lol...but more on not getting what you paid for later. So on this particular Saturday in June, I actually co-washed my hair since I had done an Alma treatment the weekend prior (more on this later too).
I detangled my hair and used a light leave-in on my hair. I added a little water to my spray bottle and mixed in my Kimmaytube leave-in and then spritzed my hair. You only need a light leave-in when you are doing a set. The more products you place on your hair, the longer it takes for it to dry.
After this, I proceeded with the process of sectioning my hair into small sections, I added a little of my shea butter mix and some Eco-styler Gel to each section, then followed the package directions...
Feed the Curlformer onto the hook, with the hook facing upwards. Place the section of hair in the hook then withdraw the hook.
Sounds easy enough right, but it took some time. I started around 2 pm and didn't finish until 5:30. In between this I needed rest breaks and lunch,lol. I'm sure it will be faster as I use it again, but it's not something you can rush through that's for sure. You will need your Saturday free in order to use this product.
Well once I was finally finished, I looked like this...


And that was it! The curls stayed in my hair through Sunday to Tuesday and I did get compliments on it. More on how I extended this style when it began to poof in my next post :).
The Natural Hair Diaries
Curlformers
I am also a Beauty Card Club Owner so I did get this product at $63.99 price. I suggest if you love Sally's like I do, you may want to do the same. The card costs $5 and you can get discounts on the products you buy instore as well as online. Not to mention coupons. But I'm getting side tracked here,lol...
Anyway, I figured it was an investment that would pay for itself since going to the salon and getting a rod set costs usually $65 and if I'm doing it myself, I don't have to get mad when the style I paid for doesn't quite look like I had imagined it would,lol...but more on not getting what you paid for later. So on this particular Saturday in June, I actually co-washed my hair since I had done an Alma treatment the weekend prior (more on this later too).
I detangled my hair and used a light leave-in on my hair. I added a little water to my spray bottle and mixed in my Kimmaytube leave-in and then spritzed my hair. You only need a light leave-in when you are doing a set. The more products you place on your hair, the longer it takes for it to dry.
After this, I proceeded with the process of sectioning my hair into small sections, I added a little of my shea butter mix and some Eco-styler Gel to each section, then followed the package directions...
Feed the Curlformer onto the hook, with the hook facing upwards. Place the section of hair in the hook then withdraw the hook.
Sounds easy enough right, but it took some time. I started around 2 pm and didn't finish until 5:30. In between this I needed rest breaks and lunch,lol. I'm sure it will be faster as I use it again, but it's not something you can rush through that's for sure. You will need your Saturday free in order to use this product.
Well once I was finally finished, I looked like this...
I will have to get some longer ones as some of my hair was longer than the curlformer so I had to use rods for those parts. Other than that, it was cool.
I sat under the dryer for about an hour under medium heat. You can do this or let it set in your hair for atleast 6 hours if you don't want to use heat.
I let the set stay in my hair until bedtime. Once I pulled it out, my hair looked like this...
And that was it! The curls stayed in my hair through Sunday to Tuesday and I did get compliments on it. More on how I extended this style when it began to poof in my next post :).
The Natural Hair Diaries
Subscribe to:
Posts (Atom)
